
Good afternoon dear readers!
Today I will tell you how to set up a TP-LINK router using the TL-WR841N (d) model as an example.
My thoughts on this model:
I think that this model turned out very well for TP-LINK, as it is easy to set up, it has a good price / quality. It is perfect for the average home user who just needs to have internet and Wi-Fi. I advise you to take this model if you are the same simple user who does not need more from the router. Many of my friends have this model (according to my recommendation) for more than 3 years. Works stably, performs its function on 5+
!
So, if you have already purchased this router, then let's set it up. Our course of action:
- Setting WiFi networks on TL-WR841N(d)
Connecting the TL-WR841N(d) Router to a PC
First, connect the power supply to the router and plug it into a power outlet. If the indicators on it (on the router) do not light up on you, then turn it on with the button on the back.
You probably noticed the disk that came with the router, and so, we will configure without its use.

We insert the second end of the wire into the network card of the laptop / computer from which we will configure the router.
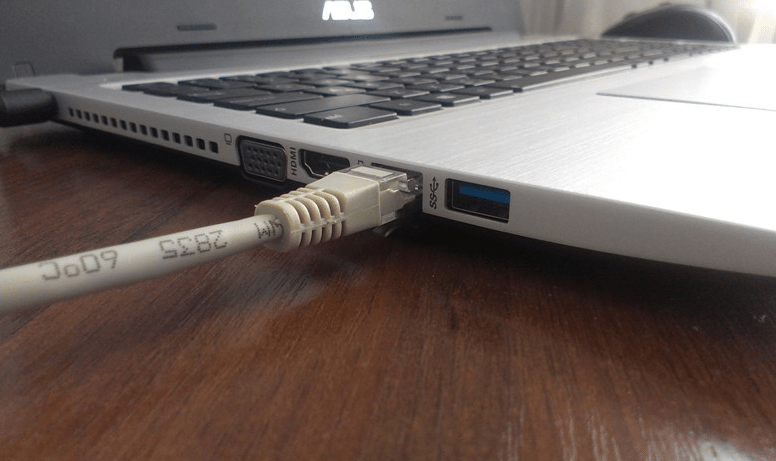
If you did everything right, then we can move on to the next step.
Internet connection setup (WAN connection setup) on TL-WR841N(d)
We need to go to the settings of the TL-WR841N (d) router. To do this, on the computer to which it is connected, open any browser, and in the address bar go to 192.168.1.1 , or 192.168.0.1 . You should be prompted for a username and password. Specify admin and admin (default password and username). By the way, how to enter the router settings, the standard IP and standard login / password are indicated on the bottom of the router on the sticker

So, we entered everything correctly, entered the username and password. We should open the router settings page.
The most important thing is to set up your router to work with your ISP. If this is not done, or done incorrectly, then the Internet through the router will not work. A Wi-Fi network will appear, but without internet access.
In settings go to the tab Network-WAN. Us in the drop down list WAN Connection Type you need to select the type of connection that your Internet service provider uses. It could be: Dynamic IP, Static IP, PPPoE, L2TP, or PPTP. For example, I personally PPPoE(the most common type of connection).

Setting up PPPoE, L2TP, and PPTP
If your provider uses one of the above connection methods, then select the one you need and set the necessary parameters that the provider should give you: username, password, IP address. It already depends on the connection type and provider you choose.

The main thing that needs to be achieved from the settings on this page is that the router connects to the Internet and starts distributing it. If the Internet is working, then click on the button Save, and continue. If you can’t configure, then call your Internet provider and ask him for all the data that is necessary to configure the router.
If your computer has a configured high-speed Internet connection, then we no longer need it. You don't need to run it. Our router will now launch such a connection. You can remove it altogether.
It may also be that the provider binds to the MAC address (you need to check with the provider), in which case you can clone the MAC in the router settings, on the tab Network-MAC Clone. Or, there you can change the MAC address of the router. You can also call your ISP and ask them to remove the old MAC from the binding and bind your new MAC address.

If the router has connected to the provider and distributes the Internet, then you can continue the configuration. To check if the router is distributing the Internet, just try to go to any site from the computer with which you are setting up the router (which is connected to the router to the port LAN)
Setting up a Wi-Fi network on TL-WR841N(d) and setting a password on Wi-Fi
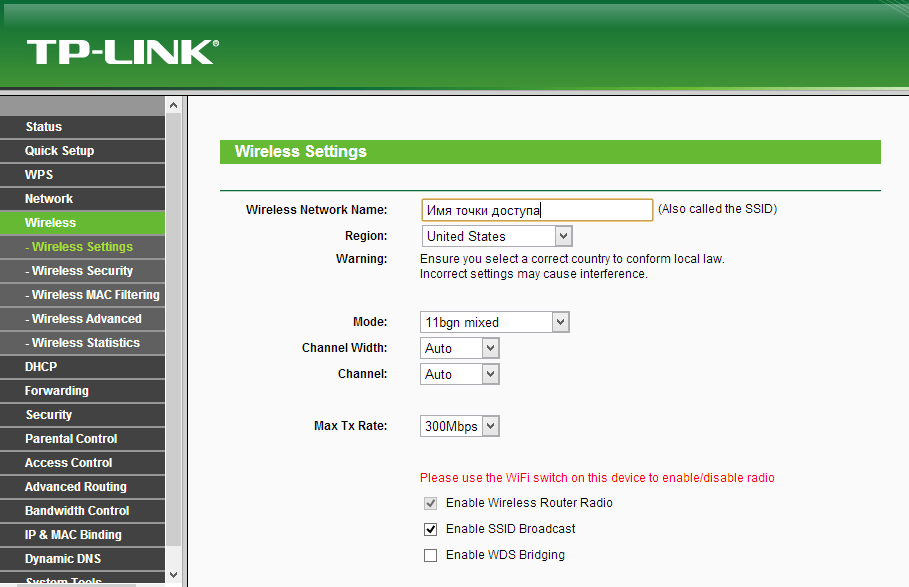
To configure Wi-Fi, you need to open the tab on the settings page Wireless - Wireless Settings. On this page we need in the field Wireless Network Name come up with and write down a name for your WiFi networks, and in the Region drop-down menu, select the country where you live. Leave the rest of the settings as in my screenshot below.
To protect our wireless network with a password, go to the tab Wireless-Wireless Security. There you need to select the type of security WPA/WPA2 - Personal(Recommended).
In field PSK Password create and write down a password that will protect your WiFi net.

Save settings by pressing the button Save.
Changing the default password for the admin user
While we are in the settings Tp-link TL-WR841N, I advise you to immediately change the standard password that is set to protect the settings of your router. So that everyone who connects to your network cannot enter the router settings and change them (for example, we gave the Wi-Fi password to a neighbor / friend).
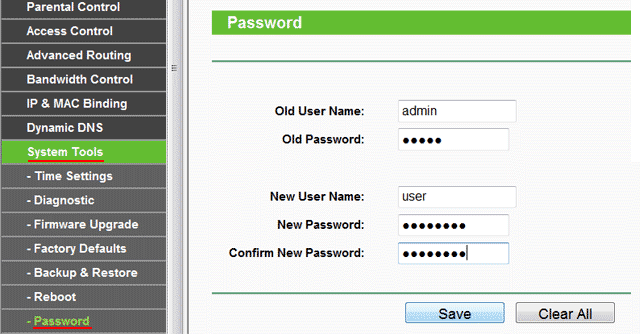
Open a tab System Tools-Password. Enter your old username and password first (default is admin). Then, below, enter a new username (you can leave admin) and New password. I advise you to write down this password somewhere, so as not to forget. Save settings with the button Save.
That's all, the configuration of the Tp-link TL-WR841N router is completed.
It remains only to reboot the router. This can be done by turning off / on the power, or from the settings, on the tab System Tools - Reboot, you need to click on the button Reboot.
After setting up, and rebooting, a Wi-Fi network will appear, with the name that we set during the setup process. And to connect to wireless network, use the password that we also set when setting up the router.
I hope this article helped you! I did my best. If you have any questions, ask them in the comments to the post. If you have an offer, you can send them to the email address
In the next article, I will tell you
Thank you for your attention! See you soon!
Currently, unlimited high-speed Internet is no longer a novelty. And even more so when it comes to the wireless connection option, which is applicable even for a personal computer, not to mention laptops, tablets or smartphones. Now the majority mobile devices has a built-in WiFi module, and their comfortable use directly depends on how good the wireless connection is in your home and how well you can connect everything to your computer.
TP-Link WiFi routers are a good example of solving problems with speed, range and antenna power. Also, you are guaranteed to get rid of the wires in your apartment. After you have purchased a router, it is very important to understand how to properly connect the device to your computer on your own. The fact is that if you already have the Internet, then the lack of knowledge on this issue can lead to additional costs for calling specialists.
In the article, we will try to tell you how to properly connect your TP-Link to a computer and perform its subsequent configuration.
Connecting to a computer
First of all, you need to open the box and make sure that the bundle of the TP-Link router matches the one described in the documentation. That is, make sure that all the elements are in place. In addition to the router itself, you need a power supply, cables, and a disk with software.
Before you connect a TP-Link router to your computer, you need to place it correctly. It's best to place the cable close to where your PC is, as the included cable isn't too long. If this fails, then you can purchase a longer cable additionally. It is very cheap and is sold in any electronics store.
The TP-Link router has the following buttons and connectors, most of which we will need when connecting and configuring:
- power button;
- WAN connector for connecting the router to the Internet;
- LAN connectors for connecting a PC using a network cable;
- turning off and on the QSS function;
- button to reset the router settings.
After you have familiarized yourself with the location of the connectors, you need to connect the power supply to the TP-Link router, and plug the unit into a power outlet. A cable is connected to the WAN socket located on the device case, which was carried out by the provider, that is, connecting directly to the Internet. The TP-Link configuration assumes at least four LAN ports, so you can connect four PCs at once if you use network cable.
Setting up a TP-Link router
Before proceeding with the setup, experts recommend performing a preliminary reset to the factory settings. After the router has rebooted, use any browser. Enter 192.168.0.1 in the address bar. Another option is 192.168.1.1, depending on the firmware version. You will automatically access the Setup Wizard.
To get inside, enter your password and login. By default, both strings are admin. For further network security, it is best to change the password during the pre-configuration we are talking about right now. To change the input data, go to the System Tools tab, where you need to click on Password. In the fields Old User Name and Old Password, you will need to enter the factory login and password, that is, admin. Create a username and password. In principle, you can leave the old login. Enter new data in the fields New User Name, New Password, Confirm New Password. The last field is the confirmation of the new password. Don't forget to save the updates by clicking Save.
On the settings page, you can optionally immediately download and install latest version firmware. The installation itself is carried out through the System Tools menu, where you need to go to the Firmware Upgrade field. In it, click on Browse, select the downloaded file and click on Upgrade. Downloading must be carried out only from the official resources of TP-Link. Fully licensed firmware is provided absolutely free of charge.
Internet setup in the TP-Link router takes place in the Network and WAN menus. The first thing to do is select the network type. If it is unknown to you, then just clarify it by calling " hotline» provider. After you have chosen the type, you will need to save the settings, for which you need to click on Save.
After successfully saving, go to the next tab labeled as MAC Clone. There is a Clone MAC Address button here, which you need to click on, and then save everything with Save.
How to set up a WiFi network on a tp link router
To set up a wireless connection, you need to go to the Wireless tab. There is a field labeled Wireless Network Name. The name of your network fits into it, and it can be chosen arbitrarily. If desired, you can enter the name of the country in the field below. Don't forget to save all changes.
The Wireless Security tab configures the security system, including protection against unauthorized access. To do this, you need to come up with a password that is not too simple and enter it in the PSK Password field.
All changes in the settings must be saved, after which the router must be rebooted. You need to reboot the device from the Reboot button located on the System Tools tab. After clicking on the button, you just need to confirm your action.
Conclusion
As you can see, there is nothing difficult in connecting and configuring the router on your own. It's really simple and doesn't take much time. And you can save money on calling specialists and the time during which you would have to wait for them.
Hello dear visitors of the blog site, today we will talk about how to set up a TP Link router of such popular models as wr740n, wr741nd, wr841n, wr842nd, wr941nd, wa850re, w8151n and others, let's start with ....
In fact, in any apartment and most private houses in the city there is high-speed Internet with unlimited traffic. Having many electronic devices equipped WiFi modules, people are increasingly paying attention to routers. It is thanks to them that you can distribute all incoming and outgoing traffic between elements home network so that the tablet, computer, and every smartphone can use the Internet connection without barriers.
But the acquisition wireless router(as a rule, such devices mean routers with an integrated Wi-Fi module and several ports WAN to connect the device to a computer and configure it) is not always an easy way to provide all home gadgets with the Internet. After all, without correct connection and there will be no Internet router settings in the house at all.
This article was written to help novice users solve the problem that arose after unpacking the router with its configuration, so as not to wait for the visit of the wizard and not to suffer with searching for the necessary information on numerous sites. It describes in detail what needs to be done in order to properly provide all participants in the home network with the Internet without sacrificing speed and at the same time encrypt all traffic. Each step of the instruction is described in detail with an indication possible problems that may occur during the setup process.
First of all, the router is connected to a computer, through which the device will be configured. After unpacking the router, it must be connected to a laptop / computer using the supplied or other available twisted-pair crimped network cable. To do this, we use LAN ports, which, as a rule, are four on the device. We connect a network cable to the WAN interface. Then we connect the power plug and plug the plug into the socket.
After successful connection operating system should automatically install the device drivers. After that, you can start setting up the device.
How to enter the settings menu?
The routers are not supplied with any additional software for the convenience of their configuration. Everything is done in a web browser window after visiting the router's configuration interface. You can enter it by going along the path: " 192.168.0.1 ". Sometimes instead of zero in the address there is also a unit. In any case, these data are printed on a label pasted on the bottom of the case and are contained in the instruction manual.

The result of the transition to this address will be a dialog box with an authorization form. As the values of the "Username" and "Password" fields, you must specify " admin».

Depending on the browser, this window may differ in appearance and functionality (there may be a function for saving data for authorization).
Replacing the login information for the settings interface
After entering the settings web interface, it is recommended to change the login password to more reliable ones in order to increase security. Although it is not necessary to do so. But after replacing this information, it must be remembered or recorded and stored so that the next time you visit the configuration menu, you do not have to reset all settings to factory settings and set them again. It's just an extra waste of time.

WAN Setup - Dynamic IP
To distribute (distribute) the Internet between network devices, you must configure the reception and transmission of data on the router itself. Some parameters may differ depending on the service provider and router, but in general the procedure is standard for all devices, and especially if you use dynamic IP address which happens in most cases.

If your ISP still does not provide automatic detection DNS servers, their addresses will have to be entered manually. This data must be in the contract that was concluded with the provider. They can also be clarified by calling the technical support number or hotline.
- In this case, check the box "Use these DNS servers” and enter their addresses or only the address of the primary server.
WAN Setup - Static IP
In the case of an unchanging IP (as a rule, you have to pay for its rental), setting up a router for an inexperienced user is somewhat more complicated, because many data will have to be entered manually.
In the "WAN Connection Type" field, select the "Static IP" value. After that, we fill in all the fields manually, entering the data received from the representatives of the provider.

When using the connection technology " PPPoE"In addition, you will have to enter the password and login from the account received from the company providing the Internet, as well as put checkboxes in the "Secondary connection" field to indicate the type of IP address.

The remaining options are not much different from the first two and involve manual entry of addresses.

Do I need to clone a MAC address?
Many providers bind the first MAC address from which you connected to the network to your account. Using other devices to access the network under this account impossible or possible, but after a certain period of time (10-15 minutes or an hour). If in this case you connect the Tp Link router to the cable entering the apartment, it will be denied access to the Internet, at least for a certain time, or even completely. To get out of the situation, the developers suggest replacing the personal MAC address of the router with the address of your computer / laptop.
This point should be clarified with the provider by phone or by studying the terms of the contract.
If you still need to change the router's MAC, go to the "MAC address cloning" subsection in the "Network" section.

Then click on the "Clone PC MAC Address" icon. As a result, the hardware address of the router will be replaced with the one that it has, but at the software level.

Setting up a Wi-Fi router
This section, for some reason, is the most interesting for beginners. Probably because it is precisely because of the distribution of the Internet over the radio channel that routers are purchased.

dispenser manufacturer wireless internet TP Link has a range of products to choose from, according to your preferences and budget. Despite the fact that all models have their own distinctive features, the connection sequences and Internet settings for the TP Link router are very similar. Next, you will get acquainted with detailed step-by-step instructions for connecting and configuring settings to get a stable Internet and Wi-Fi network.
Stages of work
First, let's make a list of procedures that you need to carry out:
- connect device to personal computer or laptop;
- connect an internet cable;
- drive in provider settings;
- set up a wireless network.
You can read in detail below how to install a router and configure it.
Connecting cables
Have you just taken your device out of the box and don't know where to start? Then use the tips from our article. First, let's look at all the available connectors and control buttons that you need to know. Regardless of the model, each TP Link has a standard set of interfaces. In the photo you can see the back of the device.
There is a socket for the mains cable, a power button, 1 or 2 USB port for connecting a 3G / 4G modem, a port for an Ethernet cable and 4 ports for connecting to stationary devices or laptops. Based on this, you can use not only a wireless network, but also use the device as a stationary modem, which increases the functionality of the Link router.
 On the front panel there are only indicators that are responsible for the status and performance of the router. Now let's move on to the connection.
First of all, connect the cable with the Internet to the Ethernet connector. Make sure that the provider has already connected the Internet. To set up, you will have to connect the device to a computer anyway. To do this, connect the router to one of the yellow connectors using the cable that comes with the kit. And finally, turn on the TP Link using the power supply and the power button on the back of the case. Now it can be configured.
First steps
Before setting up the Tp Link router, you must open the interface through a browser. You can do it like this:
- open any browser through which it is most convenient for you to work;
- then in the address bar enter the following IP: 192.168.0.1 and press Enter on the keyboard. If nothing happened, then look at the address on the back of the router;
- You will see a window asking you to enter your username and password. By default, the combination admin / admin is set by the manufacturer;
- Ready! Now you have entered the settings of the TP Link router.
Entering correct data
We have come to the most important stage - setting up an Internet connection. On the left side of the page you will see a menu with all sections.
 We will need Network and Wireless. If you are an inexperienced user, then the remaining sections will not be useful to you.
Select the connection type that will match your ISP. Select WAN Connection Type from the drop-down list. If necessary, enter a username and password. VPI and VCI values are also entered in the corresponding fields. It is worth paying attention that the login and password are entered the ones provided to you by the service provider. If you do not have such data, then select Dynamic IP (dynamic IP).
 After entering all the data, click on the SAVE or Save button at the bottom of the page. The device will then restart. If the Internet connection is stable, then proceed to set up a wireless Wi-Fi network. If the modem does not work (no site opens in the browser, except for the page 192.168.0.1), then try again. You may also need to update the firmware, which is downloaded from the official website of the manufacturer. Since devices are often sold with outdated firmware, it may not work correctly. The device is updated through the System Tools section. Before you install new version Software, make sure it is compatible with your model.
Installed and configured TP Link after reboot should provide stable access to the Internet. If so, go to the Wi-Fi settings.
Wireless connection
For TP router Link setting The wireless network is provided through the Wireless section. Let's analyze this point in more detail:
- open the Wireless Settings subsection;
- in the first field, enter the name of the Wi-Fi point;
- then select the region in which you are located;
- in the Channel field, a channel is selected, then the settings for each channel are presented;
- after setting all the parameters, press the SAVE button at the bottom of the page.
 The device will reboot again. Now turn on the Wi-Fi module on your laptop or phone to check if the wireless network is working.
WiFi password protection
To ensure that no one but you can access Wi-Fi, it must be password protected. TP Link router protection is configured through the Wireless Security subsection:
- select WPA/WPA2 security type;
- enter a unique password of at least 8 characters in the PSK Password field;
- Click the SAVE button to apply the changes.

After the next reboot, your Internet will be protected from unauthorized users. Now you know how to set up almost any TP Link, and you can do it yourself.
For example, a router is installed in a house or apartment, but in the back room a laptop, phone or tablet has a weak signal level. At the same time, it is so weak that connection is sometimes impossible.
Of course, you can connect a more powerful Wi-Fi adapter to your laptop, but what to do with your phone and tablet? In this case, we will be helped by an access point that supports the operating mode - repeater or repeater. Access point TL-WR740N will connect via Wi-Fi to your router and transmit the wireless signal further than a phone, tablet or other client device can. With the help of a TP-Link repeater, you can boost wifi signal for your devices.
Setting up an access point in Wi-Fi repeater mode
TP Link Router connects to a computer or laptop using a twisted pair cable. Power is connected to the access point using the power supply. Network card settings should be set to default.
After setting up the access point, the cable from the computer to the access point can be disconnected.
Opening the browser Internet Explorer, Mozilla, Opera, Chrome or any other, and enter the address 192.168.0.1 . This is by default, it can also be viewed on the bottom of the router.
Enter your username in the next window. admin, password admin.
Open the menu: Wireless mode - Settings wireless mode — Turn on.
After – a group of text boxes will appear below. Press the "Search" button

In the window that appears, click "Connection" opposite the Wifi network to which we will connect.

Select the type of encryption: open, or . In the last column, enter wifi network password to which we want to connect. We also install channel number, the same as the Wi-Fi network with which we want to create a WDS connection.

After that, save the settings by clicking the Save button. If the wifi channel of the network is different from the required one, then you will receive the following notice:
The channel of your access point does not match the channel of the bridged access point, do you want to change your channel to the channel of the bridged access point?
We confirm, and the channel should automatically change to the correct one.
Now it remains only to configure wifi network security settings. Go to the menu: Wireless mode - Wireless protection. We select the type of encryption and the password that is used on the router to which our TP-Link repeater is connected. In our case, encryption was used.
Please note that if you use on your router, then in the fields Type, WEP Key Format, WEP Key, Key Type settings similar to the router to which the access point will connect should be specified. Otherwise, the TP-Link repeater will not connect to the router. Don't forget to indicate correct region where your router is located. If the source router has a different number in the channel column, then the repeater cannot connect to the router due to incorrectly specified security parameters.
After setting the security settings, save the settings with the Save button and reboot.
Checking WDS Mode Activation
You can find out that the TP-Link repeater was able to connect to the router in the menu State.

Open the menu and look at the connection settings. In field Name ()- the name of the wifi network should appear, in the field MAC address- the poppy of the router distributing the network, as well as channel number and other options.
Connecting equipment to a Wi-Fi network with WDS
You can connect to WDS WiFi network smartphone with Wi-Fi, tablet or laptop. To connect a laptop to a Wi-Fi network, in the lower right corner of the screen we find the icon for managing Wi-Fi connections. In the list, select our Wi-Fi network and click the "Connect" button.
Enter the password to connect to the Wi-Fi network, which was set in the router settings. After that, the laptop will connect to the Wi-Fi network.
Checking the connection of devices to the Wi-Fi repeater
After connecting any wireless device (laptop, phone, tablet) to the Wi-Fi network, check that the device has connected to the repeater, and not to the router. To do this, on the access point, open the menu Wireless mode - Wireless statistics and see the devices connected to the TP-Link repeater.
If the MAC address of your device is not in the list, and the Internet is working on it, then the device has connected to the router, because at this point the signal of the router is better than the signal of the repeater. Set the access point away from the router and connect next to it. If the device is still unable to connect to the access point, check that the access point is connected to the router and that it has the correct encryption type and password in the security settings.


