Resizing objects in Photoshop is one of the most important skills when working in an editor.
The developers gave us the opportunity to choose how to change the size of objects. The function is essentially one, and there are several options for calling it.
Today we will talk about how to reduce the size of the cut object in Photoshop.
Suppose we cut out the following object from some image:
We need, as mentioned above, to reduce its size.
Go to the menu on the top panel called "Editing" and find the item "Transformation"... When you hover the cursor over this item, a context menu with options for transforming the object will open. We are interested in "Scaling".
Click on it and see a frame with markers that appears on the object, pulling on which you can change its size. While holding down the key SHIFT will keep the proportions.
If it is necessary to reduce the object not "by eye", but by a certain number of percent, then the corresponding values (width and height) can be entered in the fields on the upper tool settings panel. If the button with a chain is activated, then, when entering data into one of the fields, a value will automatically appear in the adjacent one in accordance with the proportions of the object.
Second way
The point of the second method is to access the zoom function using hotkeys CTRL + T... This makes it possible to save a lot of time if you often resort to transformation. In addition, the function called by these keys (called "Free transformation") can not only reduce and enlarge objects, but also rotate and even distort and deform them.
Let's say that you are taking pictures in nature and a stranger enters the frame. Or you want to change the background, clothes, add some objects to the picture. This is quite easy to do if you know, Then you can perform some specific actions with this object.
Much depends on what background the object is in. While the developers have paid attention to the tools required for selection, some will be easy for beginners to use, while others will have complex settings. Photoshop has a ton of tools. The method chosen depends on the type of object: something simple (like a banana) or something more complex (like a hair).
Selection Method # 1: "Magic Wand"
This is the easiest way. But it is effective only in 1 case: the selected background is solid, or the object is solid on an empty background.
Example: Your photo is on a white background. It can be snowy peaks or just a white wall, something light, and so on. In this example, it is very easy to cut out the object. To do this, you simply use a tool called "Magic Wand". An example of its use in the photo.
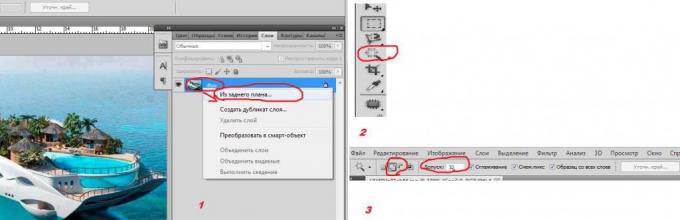
To do this, first make sure your image is on a layer - right click on the background layer.

Select "From Background" (as shown in the photo), then the "Magic Wand" tool (in the toolbar), click on the background.
Select "Add to Selection", change the tolerance to 32 and make sure that the checkboxes are checked in the "Anti-Aliasing", "Adjacent Pixels" and "Sample From All Layers" as shown in the photo.
A tolerance of 32 will select any pixels up to 32 shades darker or brighter. A higher tolerance value will increase the size of the selection, and a smaller one will decrease it accordingly.
And the result can be seen in the photo below.

The background has become transparent, and the object can be moved over it.
Selection method # 2: Pen tool
Suitable for curved objects with hard edges. An example in the photo below.

Select the Pen tool, then click, drag towards the edge, and release.
Continue to drag the tool around the edge of the object until the points meet. You can now modify the line by clicking on the anchor points and moving them. You can also adjust the angle of these points.
Once you're done, right-click on it and select "Make Selection" as shown in the photo below.

Now the object can be moved anywhere.
Selection method # 3: quick mask
Here's another method on how to remove an object in Photoshop. It allows you to quickly paint over an object, and then do something with it.
Procedure:
- Open the photo.
- Find the tool called "Brush" and click on it.
- Look at the vertical panel, at the bottom you will see an icon called "Quick Mask". You need to click on it (see below in the photo).
- Don't forget to switch the color picker so that the top (main) is black and the bottom (background) is white.
- Now paint over the objects you want to select. If you paint over the excess, then take the eraser and erase.
- The image will turn red.
- After the selection is complete, you need to click the "Quick Mask" again.
- The red will be removed, and you will see a dotted line, it shows the boundaries of the object.
- To select only the object, click Invert.

Now you know how to select an object in Photoshop using a quick mask.
Selection method # 4: color range
Suitable in cases where the background is contrasting. For example, a splash of water like in the photo below.

Go to the Selection menu, find Color Range.
Use the color picker button, click on the object.

In the example in the photo, carps were highlighted, so the color red was chosen, and you must click on the carps, respectively. Once you've made your selection, click OK. Then the image is copied and moved.
Isolation Method # 5: Fast Isolation
An example of a quick selection is shown in the photo below.

Click on the Brush tool with the right mouse button to bring up the panel (see the photo below). You can decrease the size of the brush to select small details. Hold the Alt key to add or subtract from the selection. When you make your selection, go to the Select menu, click Refine Edge.
This is a great example of how to select an object in Photoshop. You can also adjust the sliders. You should have something like the picture below.

Reducing objects in Photoshop
Let's say you want to place an object in your photo that is too large. Hence the question: how to reduce the object in "Photoshop"?
Example: the inserted does not fit the background - it is larger than it. Initially, you should figure out how to select an object in Photoshop, then you can reduce it. To do this, right-click on the object that is inserted.
A drop-down menu will appear, select "Free Transform" there. If you click this item, a frame appears around a specific object, which will have markers at the corners and in the middle. Now you need to hold down any marker with the left mouse button, as well as the Shift button, drag the marker. Using the button will allow you not to change the proportions.
Take your time and see if you like the size of the object. As soon as it suits you, release the mouse. Now you can click somewhere to make the frame disappear.
Removing objects
What to do if you are far from an ideal photographer, sometimes there are objects in the picture that are not needed at all (from people who accidentally or even specially caught in the frame, ending with bottles, cans of beer and others).
First you need to know how to select an object in Photoshop.
There are two ways to solve the problem. One of them is content-aware fill. Having selected a specific object, you need to click "Edit", after which a window pops up, where it says: "Fill with content."
An example is in the photo below.

The program will fill the area with pixels similar to the space surrounding the object. This method is used if the object is not very large.
Method 2: stamp
The use of this tool is as follows: the area adjacent to the object is copied, and thus you can paint over the objects.
Another way: crop
In some cases, it is easier to crop an image than try to clean it up. This will help "Cropping". After the canvas is resized, double click for the changes to take effect.
author Dmi_Bar92 asked a question in the section Photo processing and printing
How to enlarge or reduce a clipped object in Photoshop, when I cut and paste on another picture, then the size increased and got a better answer
Answer from [email protected]***[guru]
Absolutely correct
and you can decrease / increase by moving its sides or corners, rotate, tilt ....
It has an icon in the form of a piece of chain, if you turn it on, then you will respect the proportions of the image, never distort your object
Answer from Alexander[guru]
Editing -> Free Transform
(Edit -> Free transform)
Answer from Vzhikalka[master]
well, or squeeze ctrl + T =)
Answer from ЍduardYch[guru]
everything is easier, so that such garbage is not necessary so that the files with which you are working have the same resolution.
Answer from MAXOPKA[guru]
Professionals never recommend using "Free Transform", and it is better to reduce the desired image (copy) using the "Image Size" option in order not to lose the quality of the image. P, S. objections from photoshopers are not accepted, since I have been working with FSH for 16 years. I know what I'm saying!
Answer from Yuri Dragan[newbie]
Absolutely correct
Command line - EDIT - FREE TRANSFORMATION. a frame appears around the subject.
and you can decrease / increase by moving its sides or corners, rotate, tilt ...
In this case, the installation line will appear under the command line.
It has an icon in the form of a piece of chain, if you turn it on, then you will respect the proportions of the image, never distort your object
We often learn Photoshop using tutorials on the Internet. It is logical to assume that there is a certain slang, which is not so easy for a beginner to understand. Often the author of the lesson does not consider it necessary to explain each action, because he considers them elementary. And for a beginner, it causes bewilderment.
Now I want to give you an answer to the question: "how to resize an object in Photoshop."
Let's start with an explanation of what this mysterious object is. Anything can be an object. A whole photo, a fragment of it or a geometric figure, even a text! All these things can be summed up under one common feature. They are located on a separate layer. Namely - you have the ability to change it.
Let's simulate a situation in which you would need to resize an object. Let's say you need to make a collage. Why should you superimpose another on one photo.
Let's take a photo of this funny dog as an example.
I think one could make him a little more serious by wearing a police cap.

My cap is in png format. As we know, this format allows you to save images without a background. Drag the cap onto the original dog image.
As you can see, the headdress for our friend is clearly too small. Let's increase it.

Make sure the correct one is selected in the Layers Window. With a cap. This is what we will change. It is important!

Click on the "move" tool.

A frame has appeared around our object, allowing you to change its size. We can put the cursor on its corner, and, holding the right mouse button, drag it. The cap will increase.
But there is one trick worth knowing. To make the cap grow proportionally, hold down the shift key.
As you can see, we enlarged the cap, therefore, we learned how to change the size of an object in Photoshop.

I want to inform you about one more trick. There is a keyboard shortcut that allows you to quickly call the frame for later changing the object. Ctrl + t.
Those who did not fully understand the actions performed. This method will work for any object. Whether it's a geometric shape, photo or text. The object can be cut or pasted from another photo or picture. Little things like that don't matter. The shape or origin of the object is not important. For all of them, the above method works in Adobe Photoshop.
The size of the visible fragment of the layer of any Photoshop graphic document is the same as the size of the entire sought-for canvas of the document. Therefore, you can change it simply by resizing the original document. But Photoshop still has standard tools for editing fragment size. In order to independently learn how to change the size of a fragment, you will need to open a file in Photoshop, in which there are several fragments.
Instructions
- You can change the scale of any object in the file using the Free Transform command, it can be found in the Edit menu, or you can use the Scale option, you can find it in the same menu in the Transform list. After selecting one of the above options, drag the edge of the frame in which the object to be modified is located. If you need to maintain the proportions of the object size while resizing a layer, hold down the Shift key while stretching or shrinking. Press Enter on your keyboard to save the size.
- In some cases, the size of the image on one of the layers may be larger than the size of the main background of the document. In this case, the borders of the background of this image will go beyond the borders of the entire document. To see the borders of this background, you need to use the Navigator tool and with the help of it, zoom out the entire document to those sizes at which the borders of the larger object will be visible.
- If you need to set a specific layer size, you need to manually enter the required data in the transformation value fields. To independently change the height and width of an object, enter information about the height in the H column, and the width in the W column. The data is entered as a percentage of the original dimensions. In order for the size to change proportionally to the original, you need to enable the Maintain aspect ratio option in the settings panel.
- If the picture to be resized is on the main background, you should unlock the image. The function Layer from Background is used for this. You can find it in the Layer menu, or just double-click on the layer. Then the size changes in the same way as in the case described above.
- If you need to resize several images located on different layers while maintaining the original proportions. Then just select the required volumes while holding down the Ctrl key.
- Next, you should use the Image Size or Canvas Size function, they are located in the Image menu. The first option will change the scale of objects on all layers. The second option will resize the adjustment layers, as well as the layers containing the fill. The rest of the layers will remain unchanged.
When you change the scale of an image in Photoshop, the scale of all the layers that make up the document changes. This option can be found in the Image section. In the case when you need to resize not the entire document, but a specific layer, then you need to use the functions of the "editing" section.


